
Category: Uncategorised

Wild camping using a military basha
If you decide to go wild camping, unless you plan on bivvying under the stars for the night, setting up a suitable shelter is crucial. A shelter, very importantly gives shade, provides protection from wind and rain and also keeps in warmth; allowing for a comfortable night’s sleep and adequate rest. There’s nothing worse than having a terrible night’s sleep so you want to wake fully recharged to continue on with the next day.
A tent is likely the go to option for most, but when out on a long-distance walk, for me, bashas really are the way forward in creating a shelter for the night. It takes wild camping to a whole new level!
A military basha is as simple as it gets. By using very basic equipment, it means there is no need to mess about pushing poles through loops and searching for suitable open areas. You are able to pitch up in no time at all, with a very small foot print. The simplicity and lightness of a basha allows you to get right off of the main track and become sheltered up in minutes, well hidden from view.
Generally made out of canvas or plastic, a basha is a sheet that provides waterproof protection. Along with many mounting points it acts as a way to quickly establish an impromptu tent that can be supported by rope or bungees.
History of the Military Basha
The word ‘basha’ originates from the Eastern Indo-Aryan language meaning ‘hut’ and has been long associated with the British Army. It is likely that the term entered the British Army vocabulary during the fighting that took place in Burma during WW2. The Chindits, made up of British and Indian soldiers, went out on long range patrols behind enemy lines, staying out, often for days.
The term is also found in the Australian Army, New Zealand Army and the Singapore Armed Forces. Because they are camouflage, they provide an excellent way of creating concealed observation posts.
The greatest benefits of wild camping using a British Army basha is you have a multitude of tarp configurations to choose from. Allowing you, depending on the ground, to make any type of shelter you desire. It also provides an extremely light way of camping, making for a lighter pack allowing you to cover more ground in quicker time.
If I’m going to be stopping through the night on my expeditions, I always take my British Army MTP (Multi-Terrain Pattern) basha. my advice would be to use standard metal tent pegs, these are cheap, much stronger than using sticks, making it easier to be driven into the ground in between the rocks and roots. Also, unless you are skilled at knots, use bungees rather than cord, you can pick these up very cheaply, this allows for a much quicker set up and take down. You don’t want to be messing about with knots in the cold and rain.
Tip: if you use hiking poles, these can be used to prop up the inside of the shelter, providing a lot more space to move around underneath.
Be aware though, bashas are meant for concealment, so the whole point is for them to be low. If too low, condensation can build up on the underside. Too high, and you could be sleeping in a wind tunnel. So, before you set off on your adventure get out in your back garden and practice different configurations, experiment what works best for you. Read on to check out some of the different basha configurations.
Tarp Kit
What do you need to set up a basha?
When I plan to wild camp, I normally only stay in a place for one night. It’s important to be able to have the shelter up and down in the quickest possible time. It makes sense for me to only carry the absolute essentials, a tarp, 4 bungees and tent pegs. Some people use guylines or paracord but in bad weather do you really want to be messing about with knots? Para cords can simply wrap around the tree. I would highly reccommmedn tent pegs to peg in the cornes, I’ve tried using sticks before but just arnet secure enough and will end up snapping when pulling the tarp taught.
If you’re happy to carry more weight or plan on heading out over a few days, staying in the same spot, then you might want to consider taking extra gear to make your shelter more secure, then you can also buy basha poles or using karabiners offering a bit more flexibility. However, walking poles are excellent at being used to prop up the centre of the tarp.
Tarp
The tarpaulin/poncho. This is obciously the most important bit of kit the its what’s going to keep you dry and provide shelter for the night. E-military ones are extremely popular since they come in camoflouge and likely be able to pick one up in and Army surplurs store.
Guylines/Paracord
Super strong cord used in securing basha. Probably a better alternative when you plan on staying in one place for longer. You will need to know how to tie knots and can be fiddly untying them if the weather is bad.
Bungees
The preferred method of erecting shelter. Used in securing the tarp to trees/walls, even lamp posts. Perfect for quickly setting up and taking down shelter.
Basha Pole
Used to hold up the basha to provide more headroom and so the rain can run easily off.
karabiners
Used with paracord, they provide more flexibility when attaching corners of the tarp to securing points.
Military Basha Tarp Configurations
There is a whole host of basha setups you can deploy, some very simple and others providing a more sophisticated way of camping. We will take a look at some of the simpler set ups.
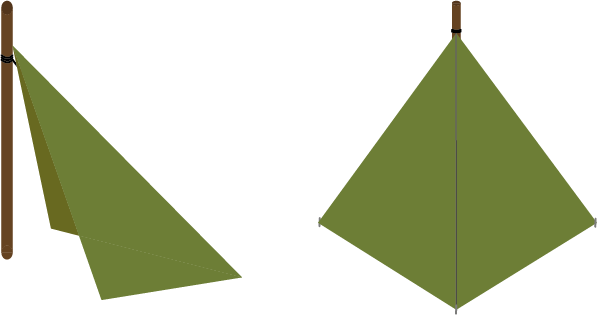
The A Frame
You can set up an A frame in two configurations. The first variation does require either basha poles, or you could use hiking poles. Start by pegging in two of the corners along the longest side.
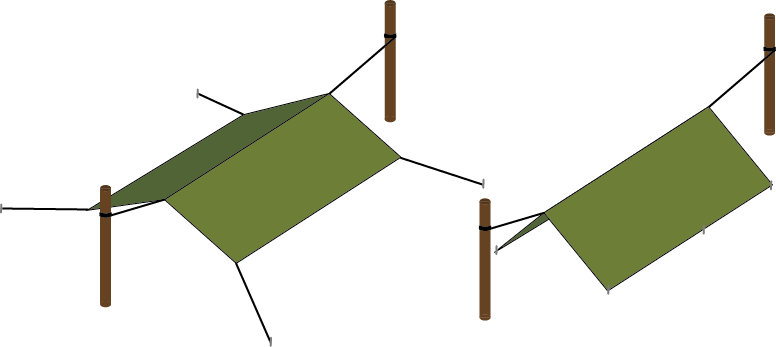
The Lean-to with/without Groundsheet
For the lean-to you can either use two trees that are about the same distance apart as the width of the tarp. Failing that, you can use a stone wall, although, for obvious reasons ensure your head is well away from the wall.
First, using bungees and at a suitable height, tie the front two corners to each tree. Next, go to one of the opposite ends and pull the tarpaulin taught and bring one corner down to the ground and peg in. Do the same to the next corner keeping the canvas under tension.
You can lower the front facing end either up or down the tree to provide more protection from the weather, depending on your preference. If you have a walking pole this can be used in the centre to prop up the middle section allowing for more room to move about underneath and for rainwater to run off easier.
A variant on the lean-to, if you have a big enough tarp, is to tuck a section of the tarp underneath which acts as a groundsheet; offering additional protection from the moisture coming off of the ground.
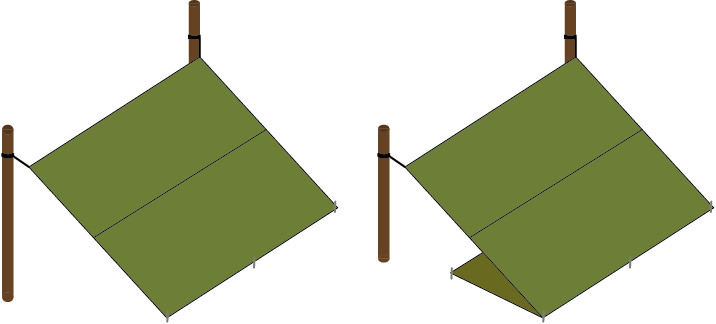
The Plough
The plough is the easiest way to set up a shelter, as it only requires one vertical support. It provides a lot of space and takes seconds to set up. Take a corner end and, at about head height, tie the corner off to a tree. Next, grab hold of the of the opposite end, pulling tight, peg into the floor.
Grab a free corner and bring in slightly and peg into the ground. Do the same to the opposite side to give it that triangle shape. Depending on the change of wind, the sides can always be brought in to offer more protection.
Where would be a good spot to set up a basha?
Now you know how to set up a basha, next, you will need to know where the best place would be to set up your shelter.
For a basha to work well you will want to find somewhere that already provides some form of natural shelter, you want to make life easy for yourself and to conserve that energy.
Unless there are, suitable, rocky outcrops that you can bunker down behind, if you are at the top of high ground, you will be exposed to wind. Head to lower ground, but not too low, as valley bottoms are likely to be wet and more liable to frost at night.
If you can, try and find a wooded area, trees are perfect as they provide an upright support, allowing you to tie your basha to any trunk. Fallen tree trunks are great as acting as a wind break, along with its base of roots and earth also providing a wall. Also, look for hollows, or shallow depressions in the ground.