
Category: Journal

Wild camping using a military basha
If you decide to go wild camping, unless you plan on bivvying under the stars for the night, setting up a suitable shelter is crucial. A shelter, very importantly gives shade, provides protection from wind and rain and also keeps in warmth; allowing for a comfortable night’s sleep and adequate rest. There’s nothing worse than having a terrible night’s sleep so you want to wake fully recharged to continue on with the next day.
A tent is likely the go to option for most, but when out on a long-distance walk, for me, bashas really are the way forward in creating a shelter for the night. It takes wild camping to a whole new level!
A military basha is as simple as it gets. By using very basic equipment, it means there is no need to mess about pushing poles through loops and searching for suitable open areas. You are able to pitch up in no time at all, with a very small foot print. The simplicity and lightness of a basha allows you to get right off of the main track and become sheltered up in minutes, well hidden from view.
Generally made out of canvas or plastic, a basha is a sheet that provides waterproof protection. Along with many mounting points it acts as a way to quickly establish an impromptu tent that can be supported by rope or bungees.
History of the Military Basha
The word ‘basha’ originates from the Eastern Indo-Aryan language meaning ‘hut’ and has been long associated with the British Army. It is likely that the term entered the British Army vocabulary during the fighting that took place in Burma during WW2. The Chindits, made up of British and Indian soldiers, went out on long range patrols behind enemy lines, staying out, often for days.
The term is also found in the Australian Army, New Zealand Army and the Singapore Armed Forces. Because they are camouflage, they provide an excellent way of creating concealed observation posts.
The greatest benefits of wild camping using a British Army basha is you have a multitude of tarp configurations to choose from. Allowing you, depending on the ground, to make any type of shelter you desire. It also provides an extremely light way of camping, making for a lighter pack allowing you to cover more ground in quicker time.
If I’m going to be stopping through the night on my expeditions, I always take my British Army MTP (Multi-Terrain Pattern) basha. my advice would be to use standard metal tent pegs, these are cheap, much stronger than using sticks, making it easier to be driven into the ground in between the rocks and roots. Also, unless you are skilled at knots, use bungees rather than cord, you can pick these up very cheaply, this allows for a much quicker set up and take down. You don’t want to be messing about with knots in the cold and rain.
Tip: if you use hiking poles, these can be used to prop up the inside of the shelter, providing a lot more space to move around underneath.
Be aware though, bashas are meant for concealment, so the whole point is for them to be low. If too low, condensation can build up on the underside. Too high, and you could be sleeping in a wind tunnel. So, before you set off on your adventure get out in your back garden and practice different configurations, experiment what works best for you. Read on to check out some of the different basha configurations.
Tarp Kit
What do you need to set up a basha?
When I plan to wild camp, I normally only stay in a place for one night. It’s important to be able to have the shelter up and down in the quickest possible time. It makes sense for me to only carry the absolute essentials, a tarp, 4 bungees and tent pegs. Some people use guylines or paracord but in bad weather do you really want to be messing about with knots? Para cords can simply wrap around the tree. I would highly reccommmedn tent pegs to peg in the cornes, I’ve tried using sticks before but just arnet secure enough and will end up snapping when pulling the tarp taught.
If you’re happy to carry more weight or plan on heading out over a few days, staying in the same spot, then you might want to consider taking extra gear to make your shelter more secure, then you can also buy basha poles or using karabiners offering a bit more flexibility. However, walking poles are excellent at being used to prop up the centre of the tarp.
Tarp
The tarpaulin/poncho. This is obciously the most important bit of kit the its what’s going to keep you dry and provide shelter for the night. E-military ones are extremely popular since they come in camoflouge and likely be able to pick one up in and Army surplurs store.
Guylines/Paracord
Super strong cord used in securing basha. Probably a better alternative when you plan on staying in one place for longer. You will need to know how to tie knots and can be fiddly untying them if the weather is bad.
Bungees
The preferred method of erecting shelter. Used in securing the tarp to trees/walls, even lamp posts. Perfect for quickly setting up and taking down shelter.
Basha Pole
Used to hold up the basha to provide more headroom and so the rain can run easily off.
karabiners
Used with paracord, they provide more flexibility when attaching corners of the tarp to securing points.
Military Basha Tarp Configurations
There is a whole host of basha setups you can deploy, some very simple and others providing a more sophisticated way of camping. We will take a look at some of the simpler set ups.
The A Frame
You can set up an A frame in two configurations. The first variation does require either basha poles, or you could use hiking poles. Start by pegging in two of the corners along the longest side.
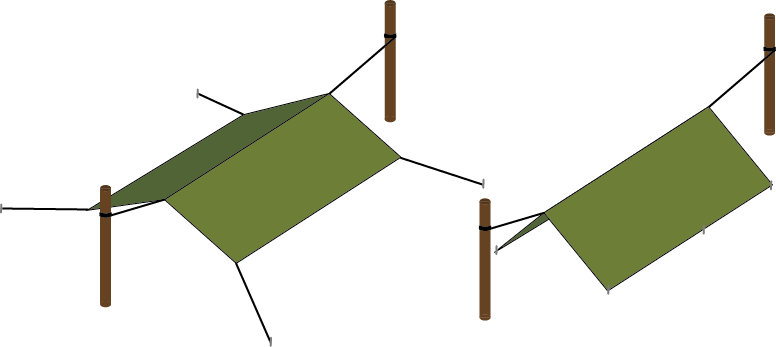
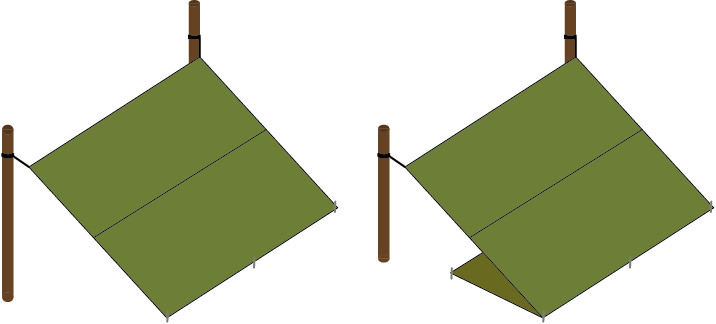
The Lean-to with/without Groundsheet
For the lean-to you can either use two trees that are about the same distance apart as the width of the tarp. Failing that, you can use a stone wall, although, for obvious reasons ensure your head is well away from the wall.
First, using bungees and at a suitable height, tie the front two corners to each tree. Next, go to one of the opposite ends and pull the tarpaulin taught and bring one corner down to the ground and peg in. Do the same to the next corner keeping the canvas under tension.
You can lower the front facing end either up or down the tree to provide more protection from the weather, depending on your preference. If you have a walking pole this can be used in the centre to prop up the middle section allowing for more room to move about underneath and for rainwater to run off easier.
A variant on the lean-to, if you have a big enough tarp, is to tuck a section of the tarp underneath which acts as a groundsheet; offering additional protection from the moisture coming off of the ground.
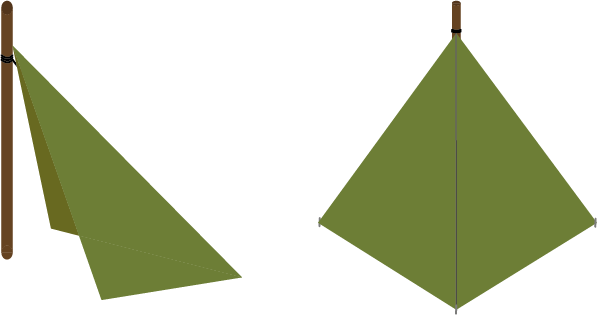
The Plough
The plough is the easiest way to set up a shelter, as it only requires one vertical support. It provides a lot of space and takes seconds to set up. Take a corner end and, at about head height, tie the corner off to a tree. Next, grab hold of the of the opposite end, pulling tight, peg into the floor.
Grab a free corner and bring in slightly and peg into the ground. Do the same to the opposite side to give it that triangle shape. Depending on the change of wind, the sides can always be brought in to offer more protection.
Where would be a good spot to set up a basha?
Now you know how to set up a basha, next, you will need to know where the best place would be to set up your shelter.
For a basha to work well you will want to find somewhere that already provides some form of natural shelter, you want to make life easy for yourself and to conserve that energy.
Unless there are, suitable, rocky outcrops that you can bunker down behind, if you are at the top of high ground, you will be exposed to wind. Head to lower ground, but not too low, as valley bottoms are likely to be wet and more liable to frost at night.
If you can, try and find a wooded area, trees are perfect as they provide an upright support, allowing you to tie your basha to any trunk. Fallen tree trunks are great as acting as a wind break, along with its base of roots and earth also providing a wall. Also, look for hollows, or shallow depressions in the ground.
A beginner’s guide to bivvying in the wild
The term bivvy or bivi comes from bivouac shelter – a term used to describe any kind of improvised temporary campsite. It is a practise often used by military personal engaged in scouting or when conducting operations out in the field. In civilian terms, it often refers to sleeping out in the open in a bivouac sack (bivvy bag), generally known as a lightweight waterproof shelter.
Bivvying, therefore, simply refers to sleeping out in the wilderness in a waterproof sack. It provides a different way of camping, a lightweight alternative to taking a cumbersome heavy tent. Although there are lightweight tents out there on the market, decent ones are likely to be costly. A good bivvy bag, on the other hand, will likely set you back around £50. Consequently, bivvying is a great option to try out lightweight camping or a mini micro-adventure. Even if you plan on a longer outing, having a lightweight pack will allow you to travel more distance in a quicker time.
Below is my guide to bivvying. Here we will explore what you should take as well as my top 4 tips for when setting out.
The benefits
It literally takes seconds set up your bed for the night
You are able to stare up at the stars
Waking up to a morning sunrise
Feel a closer connection to nature
The feeling of waking up refreshed
Minimal kit equals light weight
The Drawbacks
You will likely get wet
Why you need to try camping using just a bivvy bag.
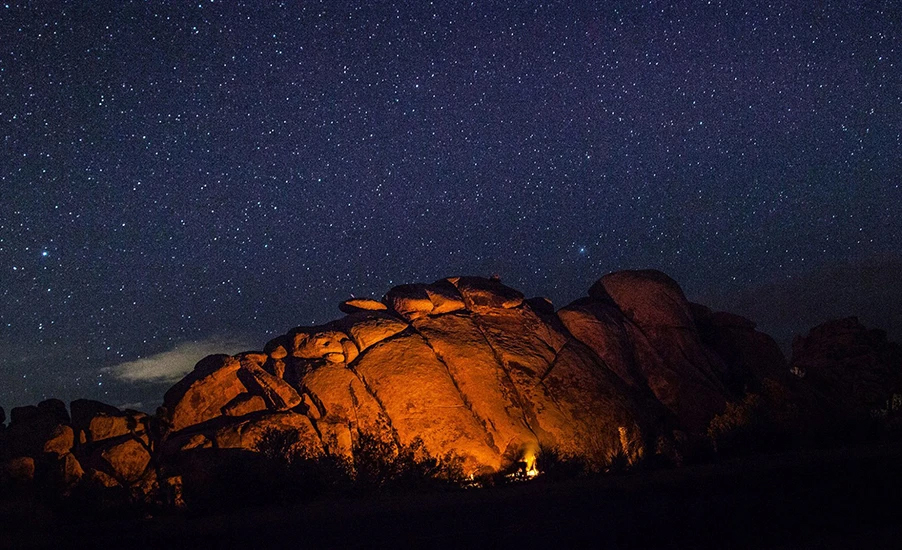
remember the first time that I experienced what the night sky actually looks like. I had travelled hundreds of miles and was in the middle of nowhere, far from any major source of light pollution. Laying down in the cool night air, I was mesmerised from the sight that towered in the heavens above me. Looking up and viewing the night sky like this, with its countless twinkling stars, is an awe-inspiring and unforgettable experience; it is certainly a sight to behold.
This is an experience most people in the western world, especially the UK, are perhaps unlikely to experience. With our densely populated urban areas in close proximity to each other, the glow from streetlights and houses obstructs this night sky. Plus, you do need the good fortune of a cloudless sky, something that the UK is perhaps, not particularly renowned for.
However, weather and lights aside, bivvying up for the night in the wild is a great experience and provides many great benefits. It is an opportunity that offers a completely different kind of venture from one of sleeping in a cramped tent.
Using a bivvy, you can literally sleep anywhere and in much smaller spaces than you would need to pitch a tent; it also allows you to be much more discrete.
The biggest benefit, however, is that there is something so majestic about waking up to a sunrise and being surrounded by natural beauty. It helps provide an even deeper connection with nature. I can honestly say that I have always woken up feeling more refreshed, alert, and more recharged from my nights bivvying outdoors.
What bivvying gear do I need?
Unlike a tent with walls and a groundsheet to provide some form of protection, I favour the most basic form of bivvying, a simple basha along with a sleeping bag and bivvy bag; here you are literally well and truly exposed to the elements.
You will want to make the experience as comfortable and pleasurable as possible so you should definitely think about taking certain bivvying gear. Of course, this will depend entirely on the length of your trip. My bivvying kit list essentials consist of the following: –
Sleeping Bag + Bivvy Bag
Given that the UK often lives up to its reputation, you will likely end up bivvying in the rain. As a result, you will firstly need both your sleeping bag, for a warm night’s sleep, and very importantly, a bivvy bag. In a tent, once you have fumbled about erecting the mini canvas house, you can crawl inside and feel somewhat protected from the elements. A bivvy bag, on the other hand, is essentially a waterproof liner for your sleeping bag, that is it. Think of your bivvy bag like a cocoon, a protective waterproof shell.
Basha (Tarpaulin)
Popular with the military, although not strictly necessary, a waterproof basha is a great addition for bivvying up. A waterproof basha provides at least some protection from the wind and rain while not completely restricting your view of your surroundings. You can hang them from the trees or peg them to the ground to create many different types of shelters.
I favour military tarps due the camouflage design, allowing you to blend into the scenery a little better. They also come with numerous attachment points and eyelets to secure rope or bungees allowing for a wider range of configurations and for rapid deployment in setting up; still a lot quicker than setting up a tent.
Sleeping Mat
Sleeping mats come in many shapes, sizes, and forms – from inflatable mats to the traditional foam roll up mat. If you do not want to wake up shivering with a numb hip in the middle of the night as a result of the cold hard ground, it would wise to use one of these.
Sleeping mats provide three roles, they impede heat generated from your body from escaping and being pulled into the cold ground. Secondly, they provide protection from moisture seeping into your sleeping bag, unless you have a waterproof bivvy of course. Lastly, they simply offer a more comfortable night’s sleep from the hard ground.
Dry Bag
Keeping your kit dry is essential. Given the size of most bivvy bags, it is unlikely that you will be able to fit all of your kit, boots, pack, and cooking system inside the bag with you. It would likely make for a very uncomfortable sleep even if you could. As a result, it would certainly be wise and in your best interest to keep all of your kit dry using a dry bag.
When you pitch up and are ready to get your head down for the night, you can throw all your valuables and warm kit in the bag and even use it a pillow. If you do not have a basha though, you might want to keep your boots inside your bivvy.
Cooking Kit + Food & Brew Kit
A cooking system speaks for itself and is certainly essential for any midweek or weekend trip. Besides, a bivvying adventure wouldn’t be complete without being able to sit back, relax and take in your surroundings with a warm brew.
I have used a Jetboil for a number of years. Although they can be expensive, they are fantastic bits of kit and speak very highly of them. They boil water in minutes, they pack very light and the best bit is they are extremely compact; both the gas and the element pack inside the cup. Don’t forget your spork!
Headtorch
A head torch is a pretty obvious item for when you are going to be out and about at night. Torches come in many forms, I would always advise a head torch over a hand held for the obvious reason that it allows you to keep your hands free. I own the Petzl Reactik which provides 210 lumens and is a great torch to shed light on a situation. Remember to keep it with you at all times during the night just in case you need to get up to answer a call of nature.
My top 4 bivvying tips
1. Check the Weather Forecast
Before heading out, you should always take a look at the weather forecast to give you some idea of what you may experience as well as the type of gear that you will need to pack. You may have second thoughts if the forecasts predict torrential rain. Although, if you are heading up to somewhere like Dartmoor or the mountains, in all likeliness the weather could be pretty much anything but it is good to be as prepared as possible.
2. Go somewhere with amazing views
Depending on where you are, bivvy somewhere that will provide a fantastic view. What better way is there to wake up in the morning with a panoramic landscape in front of you whilst watching the sunrise?
3. Find somewhere flat with natural shelter
The joys of bivvying means that you can sleep absolutely anywhere. That said, I would not recommend sleeping downwards on a hill since you may find yourself sliding off your sleeping mat and down the hill during the night (I can confirm this one from my own personal experience)!
It is best to look for places with natural shelter. You will, for example, find lots of rocky outcrops up and around Dartmoor National Park owing to its numerous tors. These provide perfect locations for protection from the wind. Other locations may include against stone walls, caves, or natural hollows in the ground. If you are next to a stonewall, keep body parts away from the wall and check nothing is likely to fall off.
4. Enjoy it and leave no trace when moving on
The most important thing of all, enjoy the experience! Switch off from the digital world and take in your surroundings. You will find that nature runs at a much slower pace than the busy lives we lead. Relax and take in the sights and sounds around you. Take the time to listen to the birds chirping, the trees rustling in the wind and the water flowing by; it all makes for a wonderful experience.
When leaving, don’t forget the countryside code: take the time to ensure that you have everything, including litter, and that the area looks exactly how you left it. This helps to protect the habitats and environment that surrounds us for all of our benefits.
Finally, if you have not already, get out there and try it!
Did we miss anything out? Have you tried bivvying or would you like to give it a go? Get in touch with your tips or experiences in the comments below.
10 of the best, lesser known, long distance walks in Britain
Have you ever thought about taking a really, really long walk?
Perhaps you have read up on famous explorers and romanticised about
following in their footsteps. Do you want to get out and explore more of
the world that we live in?
A walk in the countryside along a
country lane or even a walk into town all provide a great opportunity to
improve our health and mental well-being. It also allows us to explore
more of our local surroundings. These walks, however, will likely bring
us home at the end of the day where we can sit back and relax.
You may not think it but a long-distance walk is so much different. Firstly it requires many skills. You need to organise and plan your days – will there be public transport in case you have to abandon your trip? Where will you be staying? How will you get back? You need a certain degree of physical and mental fitness to carry on through each day. You also need to be able to navigate.
Secondly, due to the nature of a long-distance walk, you get to witness the changing landscapes and wildlife along the terrain you cross. Visiting each settlement offers the chance to find out information about local history.
Imagine this – you have prepped your kit, laced up your boots, and you are about to step out of the door and head off in the direction of some far off location venturing to somewhere that you have never seen before.
Now, we will take a look at some of the unique lesser-known best long distance walks from around the UK to give you the chance to get out there and create your own adventure.
1. The Two Moors Way

Distance: 145 km / 90 miles
Characteristics: Open Moorland, woodland, and riverside walks.
Fitness level: Challenging
GPX Download: Download Route
A slightly biased choice since I live in Devon. However, there is no better vway to embrace the true beauty of the Devonshire countryside (and briefly Somerset) than by tackling the Two Moors Way. As the route passes through three main areas and the breadth of the county, there is such a varied landscape to enjoy.
Starting in the town of Ivybridge, South Devon, located at the very edge of Dartmoor National Park, the trail will take you over the hauntingly, barren moorland of Dartmoor. The trail then follows through the rarely visited rural mid-Devon countryside. The final section of this trail takes you over another National Park, Exmoor, to arrive at the coastal resort of Lynmouth situated on the North Devon Coast and surrounded by high jagged cliff faces.
The route is waymarked with the first letters of the name, MW.
More information on walking the Two Moors Way can be found by visiting
www.twomoorsway.org.
2. John O’Groats Trail
Distance: 231 km / 144 miles
Characteristics: Shorelines and cliff tops.
Fitness level: Challenging
GPX Download: Download Route
The John O’Groats Trail is a fairly new route. Although it is walkable, it remains a work-in-progress. It is perhaps more suited to the more adventurous and fitter individual as you will encounter a number of obstacles to tackle such as barbed wire, fences, and stream fording. The trail can also become extremely overgrown in parts during July-September and you will even encounter boulder scrambling in places. However, with the help of volunteers, plans are in place to bring it up to a national trail standard.
The route is meant to be used by long-distance walkers heading north from Lands’ End. The start point is Inverness – the route then follows up along the eastern coast of Scotland to the most northern point of mainland Britain, John O’Groats. It certainly makes for a pretty amazing coastal walk with striking views of jagged cliff faces and the North Sea. Currently, only about half of the route has been waymarked with a black directional arrow labelled with John ‘O Groats.
More information on the John O’Groats Trail can be found by visiting
www.jogt.org.uk
3. Shakespeare’s Way

Distance: 235 km / 146 miles
Characteristics: Heritage, canal, literary, and urban.
Fitness level: Challenging
GPX Download: Download Route
Follow in the steps of William Shakespeare. Opened in 2006, the Shakespeare’s Way provides a wonderful cross-country route across the centre of the UK. Using existing footpaths, minor roads and bridleways, the route closely traces the path that the legendary writer, William Shakespeare, may have taken himself when travelling between his home in Stratford to where he acted and wrote his plays at London’s Globe Theatre.
Starting in his home town of Stratford-upon Avon, Warwickshire, the trail leads through some of Britain’s most best loved tourist destinations. From the Cotswolds, with its honey-coloured, stone villages to the world heritage site of Blenheim palace, Oxford. It also takes in the Grand Union Canal that runs between London and Birmingham. The final leg of this route is alongside the Thames and follows the river all the way into central London before arriving at Shakespeare’s Globe. The route is waymarked with a picture of William Shakespeare’s bust.
More information on walking the Shakespeare’s Way Trail can be found by visiting
www.shakespearesway.org
4. Palladian Way

Distance: 190 km / 118 miles
Characteristics: Heritage and architectural.
Fitness level: Average
GPX Download: Download Route
If you are keen on historic buildings, this long-distance trail is an architectural delight. This route is named after Andrea Palladio, a seventeenth-century Italian architect influenced by Roman and Greek style architecture. As a result, this trail encompasses many buildings that were built with the influence of Palladio.
This walk passes through Buckinghamshire, Oxfordshire, Wiltshire, and Gloucestershire. Starting at the historic Old Gaol in Buckinghamshire, the path crosses through Stowe Landscape Gardens and its famous Palladian Bridge. This bridge is used as the image on the waymarker that provides direction for this route.
The trail then leads onwards through attractive market towns and over the historic grounds of Blenheim Palace. Once over the M4, the scenery takes on a different backdrop and becomes one of wooded valleys and hillside passes. The final stretch brings you initially above the skyline of Bath where you will descend and follow the remaining leg alongside the Kennett and Avon canal before arriving at Pulteney Bridge in the centre of the beautiful city of Bath.
More information on walking the Palladian Way can be found by visiting
www.ldwa.org.uk/palladian-way
5. Greenwich Meridian Trail
Distance: 439 km / 273 miles
Characteristics: Heritage, canal, river.
Fitness level: Average
GPX Download: Download Route
In 1884 it was agreed that the Royal Observatory at Greenwich would be zero degrees longitude for the whole of the world. In 2009, to celebrate the 125th anniversary of the Greenwich Meridan, this trail was opened. The route is unique as it closely follows the Prime Meridian as practically as possible, using public rights of way.
Starting at the splendid meridian monument in Peacehaven on the south coast, the trail leads on over the South Downs and North Downs. The trail then heads on through London – here, the route diverges from the prime median to avoid too much street-walking and to make use of the nearby woods and common parks. After, the route continues north through Hertfordshire, Cambridgeshire, and Lincolnshire. The finishing point is the Meridian Coast crossing, close to Tunstall, east of Hull.
More information on walking the Greenwich Meridian Trail can be found by visiting
www.greenwichmeridiantrail.co.uk
6. St Oswald’s Way

Distance: 154 km / 96 miles
Characteristics: Heritage, religious, and coastal.
Fitness level: Challenging
GPX Download: Download Route
St Oswald’s Way explores some of the outstanding landscapes of Northumberland. The trail links settlements that have been associated with the seventh century King of Northumberland, St Oswald. King Oswald played a big part in bringing Christianity to the people.
Divided into six sections, you will start on the tidal Holy Island of Lindisfarne where you will find the fourteenth-century Linisfarne Castle. From here, the trail follows along the Northumberland coast down to Warkworth. You will then head inland and cross yet more beautiful countryside alongside scenic rivers and through attractive villages and farmland before arriving in Havenfield and to a section of the epic world heritage site of Hadrian’s wall.
More information on walking the St Oswald’s Way can be found by visiting
www.stoswaldsway.com
7. Dales High Way

Distance: 145 km / 90 miles
Characteristics: Moorland, National Park, fells and railway.
Fitness level: Challenging
GPX Download: Download Route
Home
to great castles, abbeys, forests, and scattered remains of old
industry, the Dales High Way presents a challenging yet stunningly
beautiful trek across the Yorkshire Dales, a designated and deserved
‘Area of Outstanding Natural beauty’ (AONB).
With over 13,900 feet
of elevation, the walk begins in Saltaire. From here, the trail leads
across the mysterious Rombalds Moor to Settle. It is then onwards north,
roughly parallel to the Settle and Carlisle Railway. The path then
meanders alongside the River Ribble before passing over the summit of
Ingleborough, one of Yorkshire’s three peaks. You will also encounter a
magnificent six mile ridge walk of the Howgill Fells.
The finishing line is in Appleby-in-Westmorland. To add that extra something special to the trip, you could even make it a circular walk by taking the breath-taking train journey back to Saltaire upon finishing. Keep a look out for waymarkers with a circular blue and purple sign with the name of the trail.
More information on walking the Dales High Way can be found by visiting
www.daleshighway.co.uk
8. Anglesey Coast Path

Distance: 195 km / 121 miles
Characteristics: Coastal, AOONB
Fitness level: Easy
GPX Download: Download Route
Created by the Yns Mons Ramblers, the Anglesey Coast Path follows much of the Isle of Anglesey coastline, an island rich in culture and heritage. The path falls within the area designated an Area of Outstanding Natural Beauty and passes through 20 picturesque settlements. The route thus takes in a mixture of scenery of stunning landscapes that includes farmland, unspoilt sea cliffs, dunes, salt marshes, and small areas of woodland. Certain sections also cater to cyclist and horse riders.
Due to the walk being a circular loop, the start and finish point can be found located at St Cybi’s Church in Holyhead. The route is identified by a circular waymarker featuring a gull, the outline of the island, and the name of the trail.
More information on walking the Dales High Way can be found by visiting
www.visitanglesey.co.uk/anglesey-coastal-path/
9. Robin Hood Way

Distance: 127 km / 107 miles
Characteristics: Woodland, forrest, heathland
Fitness level: Challenging
GPX Download: Download Route
Established to commemorate the famous historic and heroic outlaw, the Robin Hood Way runs 104 miles through areas of Nottingham associated with the legendary figure.
Beginning at Nottingham’s sixteenth-century castle, the route runs through several country parks as well as several other interesting places. The route incorporates terrain such as lowland farm and heathland as well as passing by the great houses and parks of the Dukeries, including the famous Sherwood Forest.
The route is waymarked by a bow and arrow with the name of the route.
More information on walking the Dales High Way can be found by visiting
www.robinhoodway.com
10. South West Coast Path

Distance: 1014 km / 630 miles
Characteristics: Coastal, National Park, World Heritage Site, and National Park
Fitness level: Extremely Challenging
GPX Download: Download Route
This is a very well-known trail but, for a challenge like no other, the South West Coast path at 630 miles is an absolute behemoth of a route and follows along the coast line of the South West Peninsula, taking in three different counties. The trail is as big in height as it is in length. The total height climbed amounts to 114,931 ft, nearly four times the height of Mount Everest.
The trail itself starts in Minehead, Somerset, and ends in Poole, Dorset. It has even been voted as Britain’s Best Walking Route twice in a row. The route is in fact so popular that it brings in millions a year and it is easy to see why since the path passes through some of the finest coastal landscapes in the country and through many areas that have very special statuses – both World Heritages sites and National Parks.
The route, however, is susceptible to diversions in many places due to the eroding shore line in some areas so be sure to check the website for any diversions. The trail is waymarked by an acorn.
More information on walking the South West Coast Path can be found by visiting
www.southwestcoastpath.org.uk
What are some your best long distance walks? Leave your comments below.
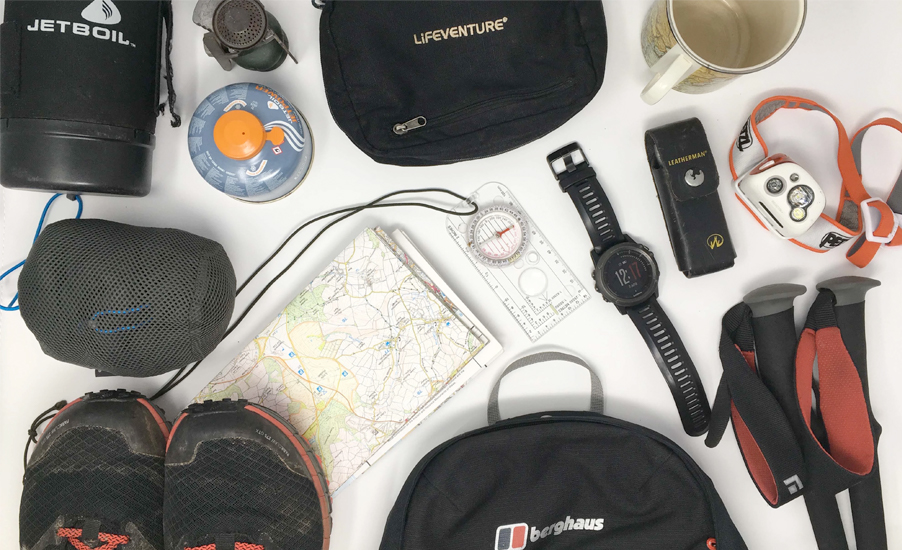
The ultimate hiking checklist on being prepared when trekking in the wild
If you’re new to hiking or are planning an outdoor adventure, but are unsure of what to pack, then our ultimate hiking checklist is the first place to start. You can download this free printable hiking packing list by clicking here.
The printable hiking checklist included in this page covers everything that you may need. It provides an insight into items that you may not have thought about taking, allowing you to tick off each item so you importantly don’t forget anything.
Even if you’ve just recently returned from your first wild outing you may have probably discovered that you missed essential items or that you even took too much equipment, things that you didn’t even use. Knowing what to take and what you need when you head out on a trip comes down to personal preference and is built up from your own experiences.
Wherever you plan on venturing for your next wild adventure, whether its scaling a high mountain, trekking through dense rainforest, taking on the challenge of completing a long-distance trail, or a simple day hike through a national park, it is wise to plan the equipment that you should take with you. Learning the importance of taking the correct gear is vital and can literally make or break a trip.
Having the correct outdoor gear allows you to be prepared
It is good practice to have the foresight and preparedness should anything happen, from trivial matters like a broken shoe lace to more extreme circumstances what should happen in an event of an emergency. Weather also plays an important role in what kit we need to take. There are a lot of scientist out there whose job it is to predict changes in weather, if they do a good job is certainly debatable. Here in the UK for example we have cold polar air from the north pushing against milder air from the tropics creating changeable weather patterns, making the weather unpredictable. I can speak from experience from being up in the welsh mountains, it being sunny one minute, the next, very little visibility from dense fog which descended out of nowhere. Never make any assumptions about the weather or the terrain for that matter.
Carrying the correct gear will ultimately allow you to overcome these kinds of issues, allowing for a more enjoyable experience and ensure that you remain safe and well.
Before you think about packing any gear, a few questions you should ask yourself are: –
- How long will my trip last for?
- How much distance will I be covering each day?
- Will I be buying food each day or carrying it?
- What am I going to do for water?
- Will I be camping overnight and where will I be camping?
- How will I get home if I must abandon my trip early?
- Does anyone know where I am going?
- Will I be taking any diversions?
- When am I be expected home?
Hiking Checklist
Below you will find a checklist that I have compiled on everything that you may want to consider taking, from what you will be wearing to everything you need to carry. Some of the items contain affiliate links on tried and tested gear that I have used myself and would definitely recommend.
This hiking checklist is a fully comprehensive list, so of course it should be edited to the type of activity that you will be undertaking. For example, you are probably not going to need a sleeping bag if you’re only heading out for a day hike.
Clothing & Boots
The most important pieces of any checklist are going to be weather appropriate clothing, as we all know how quickly the weather can rapidly change. If you get caught out, your trip can quickly turn into a dangerous activity. Therefore, a waterproof jacket and warm kit are essentials.
Hiking is all about covering distance, along footpaths, over rugged terrain. Hiking shoes are probably the most important item you will want to consider as your feet are going to take a considerable pounding. Look for shoes that fit well and are comfortable.
Trousers are perhaps the second most important piece of personal clothing. Made from special material which is both light and quick drying, providing numerous features, such as Sun protection and much needed comfort on those long treks.
Two of the most common types of socks are cotton and polyester. Both
are popular and have different benefits. Wool socks provide cushioning
and regulates the temperature of your feet from getting sweaty. Whereas
synthetic socks wick moister away, they tend to dry quicker and are more
durable.
☐ Moisture Wicking Base Layer Clothing
☐ Fleece – down jacket
☐ Waterproof Jacket
☐ Gloves
☐ Warm Hat
☐ Bandana / Buff
☐ Gaiters
☐ Trousers
☐ Socks
☐ Walking Boots + Spare Laces
Carried on Person
These are the items that you should keep on your person, close to hand, either to be carried in your pockets or worn on your body. These are items that you will likely be using a lot of the time or need on the go.
☐ Map / Map case + Compass
☐ GPS
☐ Watch / Smart Watch
☐ Wallet with ID + Enough cash to cover taxi journey / purchase food etc
☐ Whistle
☐ Headtorch
Carried in Pack
Below you will find a list of the type of items that should be carried in your pack. Most of the bulky items will go in the main compartment, these include sleeping bag, cooking system and tent, items that you won’t frequently need access to. Ideally, you will want to make the most used items, any snacks, lightweight clothes, easily accessible; store these either at the top of your back pack or in any outer pockets that may be on the sides. Store the heavier items closest to your back, with lighter kit to the sides or at the top.
☐ Dry Bag
☐ Rain cover Liner (Over the top of your pack)
☐ Waterproof Bags
☐ Spare Clothing (t-shirts, trousers)
☐ Spare Underwear
☐ Tent / Bivouac
☐ Sleeping mat
☐ Sleeping bag
☐ Travel pillow
☐ Cooking Stove
☐ Waterproof matches / lighter
☐ Cooking pot
☐ Lightweight shoes / sandals
☐ Dinner plate / bowl
☐ First Aid Kit
☐ Hand Sanitizer
☐ Prescription medication
☐ Blister Treatment
☐ Sun cream
☐ Sunglasses
☐ Lip Balm
☐ Insect repellent
☐ Baby Wipes
☐ Alcohol Wipes
☐ Toiletries – Toothpaste / toothbrush / shower gel, etc
☐ Microfibre Towel
☐ Trowel for sanitation
☐ Toilet Paper
Nutrition and Fluids
Food and water are vital for maintaining sustenance and hydration
throughout the length of a trip, food to carry you the distance by
fuelling your muscles and water for regulating an optimum body
temperature. If you plan on taking your own food, you should carefully
plan the type of foods that you will be carrying. Separate into days, to
save on weight, dispose of any additional packaging before heading off.
Water
should not be skimped on; 1 litre of water weighs roughly 1 kg, so this
will add a lot of weight to you pack. If you’re heading out for a few
days, plan ahead where you will be able to resupply.
☐ Food + Trail snacks
☐ Vitamins and Minerals
☐ Water Bottle / Bladder Pack
☐ Electrolytes
Extras
Below are a few additional extras. If you haven’t used trekking poles before they should definitely be worth your consideration. These provide their worth by supporting your body, taking pressure off your joints. They are also great at stabilising you when descending or traversing boggy ground.
☐ Walking Poles
☐ Multitool / Knife
☐ Cable Ties
☐ Portable battery charger
☐ Outdoor journal + pen / pencil
☐ Camera
☐ Guide Book
☐ Binoculars
☐ Spare batteries
☐ Battery Power Bank
☐ Emergency blanket
☐ Para Cord
Additional
Although a route card is not specifically part of your kit, it is an added extra and would be wise to leave one with a family member or friend. A route card essentially outlines your intended route, along with your personal details, name and address, start time, your predicted finish time and contact number.
You can download a route card the DofE have compiled from the link below: –
! Important !
Don’t forget to report back to the person who you left the route card with, otherwise you could spark a response by the emergency services.
☐ Route Card
6 amazing benefits of being surrounded by nature
1. It can keep you mentally healthy and happy
With an increasingly demanding working environment, our day-to-day lives seem to be more stressful than ever before. Of course, everyone has different stress triggers – it may be the school run, the daily commute to work, increased working hours, running your own business, living from pay check to pay check, working a high-profile job, being stuck in a job that makes you miserable, or a chronic illness. These are just a few examples of daily worries that might affect us; in reality, the list is endless. All, however, have a cumulative impact on our mental wellbeing. If we allow it to, these stresses can easily get the better of us and may lead to anxiety and/ or depression.
How do you deal with such issues? Well, stress is a normal part of life but how you learn to deal with these factors is key. Getting out in nature provides the most natural and purest form of escapism from the burden of our worries. Of course, it would be foolish to suggest it is a magic cure that will alleviate all of our problems. We are still going to have face reality when we return from an outdoor adventure. However, there is joy to be found in leaving those worries behind for fifteen-minutes or five days while surrounding yourself with nature.
As we become increasingly digitally attached, getting out and exploring nature reconnects us to the natural world and our home, Earth. Taking a stroll around the countryside helps to relax and calm the mind. It provides an opportunity to completely switch off and leave our woes behind, offering a much needed respite to recharge our brains. If you disconnect yourself from your digital devices, you will really start to notice the beauty of the natural surroundings around you. The trees, grass, hedgerows, mountains, and wildlife offer a thriving community full of life. A sure positive boost to stimulate one’s mood.
In fact, a 2015 report by researchers found that those who spend 90 minutes in nature displayed decreased activity in the brain associated with mental health problems. On the other hand, those who walked through urbanised areas saw no noticeable change. Why not give it a go?
Another benefit to being in nature can be found in the new skills that you may acquire as a result. As you spent more time in nature, hopefully you will want to learn more about it. This offers a chance to learn new skills that you would typically not need in your day-to-day life. Long walks, for example, may encourage you to take up map-reading and learn to utilise a compass. Alternatively, hiking may inspire you to start camping and you could learn how to pitch a tent, start a fire, or forage for food as well as a variety of outdoor survival skills. All of these new skills can help to boost self-confidence and self-esteem as well as help build a sense of purpose and enable you to connect better with others around you. You may even find you could join a club to meet new people, improve your social network, and practice your newfound skills!
Setting and achieving goals also works wonders for your mental health. Whether it be setting yourself a goal of completing a five-mile walk or climbing a mountain, at the end of the day you will be surprised at the sense of accomplishment you feel for completing your goal. Try not to get disheartened if all does not go to plan that day – remember, you can try again another day – there is always another day, another trail, and another mountain to see and conquer. You will feel all the better for it.
Why not set a goal of completing a long-distance walk? Check out our collection of walking guides.
2. It can improve your physical health and wellness
Being outside typically involves some kind of exercise. Whether you are out for a short 15-minute stroll around the local park or taking a hike up a mountain, chances are you will be getting the blood pumping around your body and increasing your heart rate while building up a sweat. Physical activity in nature does not have to be boring. In fact, there are countless, fun, sporting activities that take place outdoors. Walking, backpacking, cycling, kayaking, swimming, climbing and running are all physically demanding and provide a fantastic way of combining exercise with nature.
Exercise is important for us. Regular physical activity will enable you to manage your weight better, reduce the risk of a heart attack, lower your blood pressure, lower your blood cholesterol level, lower the risk of type two diabetes and some forms of cancer, and lower your risk of falls by enabling you to have stronger bones, muscles, and joints – thereby also lowering the risk of developing osteoporosis. Exercise also allows us to recover better after periods of bed rest and/ or hospitalisation. Finally, as mentioned in the previous section, exercise will give you more energy, put you in a better mood, help you to feel more relaxed, and to allow you to get a better night’s sleep.
3. You get to learn about science and nature
Spending more time in nature allows you to naturally learn more about it from a first-hand perspective. Hopefully, intrigued by what you see around you, you will be interested enough to find out what it is – from vegetation to animals. Again, this can tie in to mental health benefits as consistent learning grants you new confidence. Why not go for a walk and teach your partner, children, or friends what you have discovered? Did you know, for example, that sunflowers follow the movement of the sun east to west across the sky in a process known as heliotropism? Or that a group of foxes is called a skulk or leash? Seeing these plants and animals first-hand should inspire you to find out more about them.
4. When you’re stumped for ideas it can increase productivity and creativity
Today, our minds are being bombarded as different technologies compete for our attention daily. This can lead to an overload of information resulting in mental fatigue, a feeling of being overwhelmed, and, in more extreme instances, experiencing burnout.
Even at its most basic level, a brisk walk through the countryside for example, nature helps to clear the head – making us much more receptive to new ideas and, in turn, greatly improving our creativity and problem-solving potential. Immersing ourselves in nature provides a fantastic opportunity to find inspiration from the new area around us. The beauty of vast oceans, a fleeting animal, an oddly shaped tree, or a striking panoramic view from a hill top helps to conjure powerful emotions within us and plays an important part in creating boundless creative ideas.
This benefit is a proven side-effect of nature. According to a 2013 report, published in the British Journal of Sports Medicine, tests revealed that walking in areas with green space for as little as 25 minutes gives your brain a rest and boosts cognitive functioning.
Nature also helps boosts productivity. For some, pent up stress levels can cause you to want to hide under your duvet wrapped up until the problem has melted away. Unfortunately, rarely does this occur. Instead, going out for a walk and enjoying nature will, as mentioned earlier, help to relieve some of this stress. As a result, the task may not seem so big and daunting – instead, with a clearer head, it can appear more manageable and give you the motivation you need to get started, continue, or to complete the project at hand.
5. Become more sociable and build friendships
Though some people use nature as a chance to be alone with their thoughts, nature also offers a great chance to meet so many new people. There are so many opportunities to bond with others. You could join a local walking, cycling, hiking, or running club and discover new routes and learn new tips – from mending a puncture to finding the most suitable boot for the activity you wish to pursue. Of course, there are plenty of other sports too – find your local kayaking, canoeing, rafting, caving, climbing, horseback riding or surfing group! Not only will these groups enable you to meet likeminded people, you can improve your social skills and even develop your team-building capacity.
Alternatively, if you do not feel like doing a sport but wish to enjoy the outdoors and meet new people, you could volunteer at your local nature reserve and help educate others around you and share your newfound knowledge. It also helps the environment as you can support nature conservation in the process. Charities such as the RSPB (Royal Society for the Protection of Birds) or the Canal & River Trust often also require volunteers to help keep their charity afloat. You can find different volunteering roles online – one particularly good site for roles in the UK can be found here: www.environmentjob.co.uk/volunteering.
6. Develop an awareness of the environment
Getting out and exploring our surroundings undoubtedly helps us to develop an appreciation of our environment and the world we live in. You don’t have to go far either – you may be surprised what you can even find in your back garden! Cities also have more to offer than meets the eye and can grant a chance to explore the outdoors in a different but equally meaningful way, particularly when it comes to learning about the history of an area and the impact humans have on shaping the environment around us.
Getting out in nature also offers the chance to explore new places you may not venture to otherwise. With a new love for hiking or climbing, you may choose to holiday in the Peak District or take a trip further north to Scotland. Nature is all around us and is begging to be explored. Visiting such places can also teach you how to make a difference to improve our environment – seeing plastic bags strewn everywhere will hopefully help you to remember your reusable carrier bag next time you visit the shops.
Research even suggests outdoor play in natural environments is extremely beneficial for children as it helps to develop capacity for ‘creativity, symbolic play, problem solving, and intellectual development’. Outdoor play allows children to develop a greater understanding of the natural environment too as they ‘show a growing concern and appreciation for natural environments, explore relationships between living and non-living things, observe, notice, and respond to changes in the environment, [and] develop an awareness of the impact of human activity on environment and the interdependence of living things’. I find the same effects happen to me as an adult too.